
Posted by Jeffrey Swerdan on Oct 18th 2023
What measurements and tools will you need to install your chimney liner?


What measurements and tools do I need to install a Chimney Liner?
You've done the research and looked through all of the different options for chimney venting systems and you have decided that a flexible chimney liner is the best choice for your project. Now all that's left is to figure out what measurements and information you need to know to purchase the proper chimney liner kit and to install it correctly.
Chimney Liner Installation starts by assessing your heating appliance as well as your chimney flue lining
The first bit of information you need to know is what kind of heating appliance you are looking to vent and what type of fuel it burns. This will help when determining which Chimney liner product is going to work best for you. Chimney liners can be used for gas and wood-burning fireplaces as well as some wood stoves and a variety of other heating appliances.
The next step is to assess the condition of your chimney flue. For this step, it is recommended to have your chimney inspected by a professional certified chimney sweep or installer. They will be able to make sure that there is no damage either visible or concealed within the flue cavity. A lot of professionals have camera systems that will allow them to inspect the chimney flue in a way most homeowners won't have access to or be able to. The camera systems can inspect the bottom of the chimney all the way up the flue to the top plate and termination. Sometimes this video inspection is the only way to determine what material your flue is made of. It could be a clay tile liner, masonry, or even metal. The inspection will also make sure there isn't a creosote buildup within the chimney.
One other thing you will want to decide is where and how the chimney liner will terminate. You want to make sure there are no obstructions within the clearance radius. Also deciding on this point while in the measuring stage will ensure you have the right length of chimney liner.
Also, be aware of your state and local building codes and regulations to make sure that you comply with all of these requirements.
Once you have determined the fuel type, appliance type, termination point, building codes, and structure of your chimney it is time to move on to the next step.
Proper Chimney Liner replacement and new chimney liner installs require proper measurements in order to select the right liner kit
In order to collect proper measurements you will need a tape measure, a ladder to get onto your roof, and paper and pencil to write down all of your measurements.
The measurements that you need to collect are:
The Chimney Height - You will want to measure from the top of the chimney crown down to the point where the chimney liner will connect to your heating appliance. This measurement is important to calculate the total length of the chimney liner that you will need to purchase. You will want to purchase the next size larger than the length of your chimney height. For example, if you have 31 feet of chimney height, you will need to purchase a 35-foot liner and then you or your installer can cut it down to the proper size.
The Outlet Size of your Heating Appliance - You will need to measure the outside diameter of the outlet of your heating appliance. This will help you determine the diameter of the chimney liner that you need. You can also reference your appliance manual for this information as well.
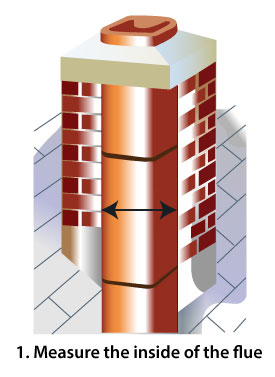
The Flue Size - You will want to measure the diameter or width and depth of the chimney flue opening. Ensure that you measure the widest part of the opening as well as the narrowest part of the opening to make sure that the liner will fit all the way through the flue. Even if you have a round flue, there is a good chance that it is not perfectly round the entire run of the pipe. This is where having your chimney inspected by a team with video equipment can save you time.
Clearances - You will want to refer to your heating appliance manual as well as your state and local building codes to ensure what the clearance requirements are in your area for your specific heating appliance and venting components. Then you will want to measure the area around the appliance as well as the around where the venting will go, to make sure you are compliant with these restrictions.
Check prices, styles, and costs, and then order your chimney liner
You can check out the full line of all of the Chimney Liner Products that are offered by Northline Express.
Tools and items you will want to have on hand for the project
Here is a list of a few tools and items that you will want to have on hand to complete the job:
- New Chimney Liner Kit: The flexible chimney liner components should be on hand. These components include the liner itself, tee and appliance connectors, and possibly insulation. The kit could also include a termination rain cap and the top plate that is installed over the liner above the roof.
- Installation Instructions: The first thing you want to review is the manufacturer's instructions. They are usually included with the liner kit and will help provide guidance on the specific installation process all the way from the appliance connector up to attaching the liner to the top plate over the liner and more.
-
Ladder: A stable ladder and/or scaffolding to access the roof and the top of the chimney.
-
Tape Measure: To measure the chimney height and the required length of liner, as well as to ensure proper clearances. Be sure to measure prior to cutting anything.
-
Chimney Brush and Rods: Used for cleaning the chimney before installing the liner to remove any debris or obstructions.
- Chimney Vacuum - To help clean up any mess that is made.
-
Work Gloves: To protect your hands during installation and also when handling the liner and components.
-
Wrenches: For tightening clamps and connectors.
-
Caulk Gun and High-Temperature Sealant: To seal connections and joints in the liner and between the liner and the termination cap.
-
Screwdrivers: For securing connectors and termination caps.
-
Tin Snips or a Saw: To cut the liner to the required length and trim insulation, if necessary.
-
Vent Cap Installation Tool: If your termination cap requires a specific installation tool, make sure you have it on hand
-
Flashlight: For inspecting the chimney and ensuring that the liner is properly aligned and connected.
-
Safety Gear: Personal protective equipment, including safety glasses, a dust mask (when cleaning the chimney), and work boots.
-
Chimney Inspection Camera: Optional, but useful for inspecting the interior of the chimney to ensure there are no hidden obstructions or damage.
-
Fireproof Drop Cloth or Plastic Sheet: To protect the surrounding area in the home and on the roof from debris and sealant drips.
-
Plumb Bob: To ensure the liner is properly centered and aligned within the chimney.
- Bucket and Cleaning Brushes: For cleaning and disposing of debris removed from the chimney.
FAQ - Measuring for a Chimney Liner
How long does it take to install a chimney liner?
In a basic install with no complications, it could take anywhere from 3 hours up to and exceeding 8 to 10 hours. However, the length of time needed to install a chimney liner kit can vary significantly depending on the scope of work needed. There are several factors including the height and configuration of the chimney, the experience of the installer, the weather, the type of liner, and if any other repairs or modifications are needed. As with any home remodel, there can be any number of hidden factors that may need to be addressed during the installation.
How much does it cost to reline a chimney?
There are a few different ways you can reline your chimney. If you want to add a flexible chimney liner kit these can range from between $20 and $40 per linear foot. The price will vary depending on the grade of stainless that you choose and the overall length and diameter of the liner that your project calls for.
How much will it cost to have someone install my chimney liner?
The cost of installation varies greatly depending on the area that you are in and the season in which you want it installed. It will also depend on the complexity of the job. On the low end, you could expect to pay between $1,000 to $3,000 for a simple install, whereas a more complex install could be anywhere from $5,000 or more.
Where can I go to learn more about Chimney Liners?
Northline Express offers a Resource Center with helpful articles on a variety of topics. Here are some of the Chimney Liner articles that we offer:
- Can Installing a Chimney Liner myself save me hundreds
- What Measurements and Tools you need to install your Chimney Liner
- How to Install a Chimney Liner
- Which Chimney Liner is Best for Me
- Duraflex Flexible Chimney Relining System
- DuraLiner Chimney Relining System
You can also check out the Northline Express YouTube Page for these helpful videos:
- How to Install a New Chimney Liner Yourself
- What type of Chimney Liner Should you Use
- Full list of Chimney Liners Videos
